A Typical Rack-Mounted Server. This one isn't ours.
The Mathematics, Computer Science, and Statistics programs together maintain a
powerful, centralized Linux server named logos that is accessible from
on or off campus. For most computer science courses, all of your files,
code, programs, and data will be stored on logos. Other courses will have you
running software
on logos to get better performance or take advantage of the software we already
have installed.
Having Trouble?
If you are having trouble accessing logos remotely, please see below.
What happened to radius?
Our previous department compute server, named radius, has been
retired. All data and accounts have been transfered from radius to
logos.
In the Lab or Nearby (using the NUCs)
When in the Integrated Science Complex or nearby, you can take advantage of
the system of networked terminals (called "NUCs") in Swords 219, Haberlin 136, and the McBrien
Student Lounge (Swords 3rd floor), all of which are configured to be able to
easily and transparently access logos and all of the software and files you
have stored there. All of these NUC terminals work equally well for accesing
logos.
Outside the Lab
You can also access logos from your own computer, using a variety of
remote-access software, described below. All of this software is
industry-standard and very widely used—for cloud computing, software
development, scientific research, business and e-commerce, etc.— so
learning how to use it effectively will almost certainly be worth it regardless
of what you plan to do after Holy Cross.
There are a few different categories of remote access. You'll probably use a
combination of all them at various times:
Software for editing and accessing remote files.
Using a text-only command-line remote shell to run commands.
Transferring files between logos and your own computer.
Software to edit plain-text files locally on your own computer.
Full graphical and desktop access with support for graphical software.
All the software we recommend on this page is free, except where
noted. You should not have to pay to access logos.
International
Students & Travel: Accessing our systems from China, and many other international
locations, requires special instructions. Please contact your instructor.
Logos only allows direct remote access from certain secure, authenticated
networks, such as on-campus "HCWireless" WiFi, wired on-campus dorm networks,
and the computer labs. Other, insecure and off-campus networks require
installing and activating the Holy Cross VPN.
✅ If you have a laptop and are connected to the on-campus "HCWireless"
WiFi network, you can access logos remotely without the VPN.
✅ If you have a desktop or laptop with a wired on-campus connection, you
can access logos remotely without the VPN.
❌ If you use the "HCGuest" WiFi network, you must use the
VPN to access logos.
❌ If you are off campus or using a cell-phone hotspot, you must
use the VPN to access logos.
Installing the Holy Cross VPN for MacOS:
Download and install the VPN software from this shared google drive (for MacOS, choose the ".pkg" file).
It will require log in using your campus credentials.
After installing, you should now see a small globe icon in the top menu bar.
You need to activate the VPN whenever accessing logos remotely:
Click the globe icon.
Enter "palovpn.holycross.edu" when asked for the portal address.
Click "Connect" and enter your Holy Cross Gmail credentials.
The VPN should be activated and you can now connect to logos.
Click the globe to de-activate the VPN when you are done with logos.
NOTE: Whenever the VPN is active, ALL your data is routed
through Holy Cross and is subject to Holy Cross network policies, campus code of
conduct rules, etc.
For more info, see
these
VPN instructions from ITS for Windows and MacOS.
Installing the Holy Cross VPN for Windows:
Download and install the VPN software from this shared google drive (for Windows, choose one of the ".msi" files).
It will require log in using your campus credentials.
After installing, you should now see a small globe icon in the top menu bar.
You need to activate the VPN whenever accessing logos remotely:
Click the globe icon.
Enter "palovpn.holycross.edu" when asked for the portal address.
Click "Connect" and enter your Holy Cross Gmail credentials.
The VPN should be activated and you can now connect to logos.
Click the globe to de-activate the VPN when you are done with logos.
NOTE: Whenever the VPN is active, ALL your data is routed
through Holy Cross and is subject to Holy Cross network policies, campus code of
conduct rules, etc.
For more info, see
these
VPN instructions from ITS for Windows and MacOS.
Installing Activating the VPN for Linux:
There are a few versions of the VPN. Try them all until you find one that works
for you.
Try to install the VPN software from this shared google drive (for Linux, choose the ".tgz" file).
NOTE: Whenever the VPN is active, ALL your data is routed
through Holy Cross and is subject to Holy Cross network policies, campus code of
conduct rules, etc.
Installing and Activating the VPN for ChromeBooks or Android phones and tablets:
You can try to install this APK Package for Android (use your Holy Cross Gmail credentials to access this shared drive),
NOTE: Whenever the VPN is active, ALL your data is routed
through Holy Cross and is subject to Holy Cross network policies, campus code of
conduct rules, etc.
Installing and Activating the VPN for iOS on iPhones or iPads:
NOTE: Whenever the VPN is active, ALL your data is routed
through Holy Cross and is subject to Holy Cross network policies, campus code of
conduct rules, etc.
We recommend you install Visual Studio Code
(also known as "VS Code" or "vscode") on your own computer. This is a fairly popular
"modern" code editor, with syntax coloring, and other helpful features. It fulfills almost
all of the needs identified above: it has support for editing and accessing remote
files; it provides a text-only command-line remote shell; it can easily
transfer files to or from remote servers; and it can edit plain-text files
locally on your laptop. The only thing it can't do is graphical access. For CSCI 131,
vscode alone is enough for the first few labs and several of the projects, with no other
software needed. For CSCI 132, vscode is enough for everything.
How to install and configure vscode to work "seamlessly"
with our logos server:
WARNING:
Please be sure to use a current edition (1.81 or later). If you
previously installed some older version, please update. Earlier versions will
cause significant issues for our servers.
Go to "extensions" (boxy icon in the vscode window left margin, or Control-Shift-X),
search for the "SSH" extension, and install it. There will be many similar
extensions available: get the one named "Remote - SSH" (tag:
"ms-vscode-remote.remote-ssh") published by Microsoft with over a million
downloads. (If you have a very old and un-updated version of Windows 10 without
the "OpenSSH" components, follow the "Installing OpenSSH" steps
here.
If using an even older version of Windows, before Windows 10, you
will probably need to install git
which comes with the necessary ssh client software.)
If you are using the HCGuest WiFi or are located off campus, you'll need to
activate the Holy Cross VPN before completing this next step.
Once the "Remote - SSH" extension is installed, click the small green icon
in the vscode window bottom left corner, select "Remote - SSH: Connect to Host...", and
enter username@logos.holycross.edu as the host.
Replace "username" with your Holy Cross login name, e.g.
aturing22. Use the same password you would use for Moodle, STAR, and Canvas.
You might need to enter the password twice.
If asked to select the "Remote Platform", pick Linux. All of these settings can be saved in vscode.
Once connected, you can browse folders on logos (click the file
icon on the left side), open and edit files on logos (just click a
file in the left panel), open a terminal window with a text-only command-line
remote shell (under the menus, "Terminal > New Terminal..."), transfer files
to or from logos (just drag-and-drop files using the vscode side panel and your
own computer's desktop), all you can do all this staying within vscode.
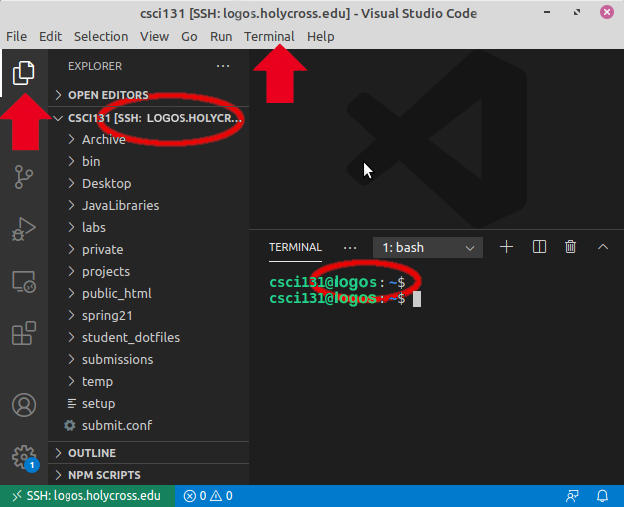
Check your vscode connection to logos: After connecting, you should
probably have two vscode windows. One is still working on your local machine.
The other, new window, is connected to logos and should show a green box in the
lower left corner with a note similar to "SSH:
logos.holycross.edu". Here is a screenshot demonstrating
a successful connection using vscode.
Try out the file browser and vscode terminal:
While connected to logos, select "Terminal > New Terminal..." from
the menus. You should get a split-screen window with a terminal in the bottom
half of the screen, saying something like aturing22@logos~$. If you
type things in that lower window, it should respond. If you type whoami, it should print your login name, for example. While
still connected to logos, also try clicking the file-open icon in the
left side panel (if asked, next click "Open Folder" then, when prompted for the
folder name just say "OK" to the default, which should be something like
"/home/stu/cl2022/aturing22"). This should show a list of all your
logos folders and files in the left panel. You might not have many
files or folders yet.
Here is a screenshot demonstrating
both a vscode a terminal and the vscode file browser while connected to
logos.
Note: vscode does not support graphical applications in its built-in
terminal—the vscode terminal is entirely text-only mode. So for projects
that need graphical support, you'll have to run them outside of vscode, using the
graphical software described below.
SSH, the secure shell protocol, is the standard way to access remote linux
servers. It is used extensively in industry and research, and even for things
like hacking at home, cloud computing, or scientific computing. So it's worth
learning. To use SSH from your laptop, you need an SSH "client". Fortunately,
Windows 10 and Mac OS both come with SSH clients already installed, so there is
no more software needed. All you have to do is learn to use it.
Quick start for Mac OS X:
Open Terminal. You can find it in the Utilities folder, which is
in the Applications folder... or just type "Terminal" into the
spotlight/search box.
Within Terminal, type: ssh username@logos.holycross.edu Change username to be your own username, e.g. aturing22.
Type your password when prompted. You might not see any text as you type
the password. That's normal.
You're now logged onto logos. Whatever commands you now type
will run on logos, and you can use all of your logos
files.
When you are finished, type exit or
logout at the prompt to log out of
logos. You will be back at your Mac's terminal prompt. You can
close Terminal, or start a new ssh session again.
Quick start for Windows 10:
Open Powershell. You can find it in the start menu.
Within PowerShell, type: ssh username@logos.holycross.edu Change username to be your own username, e.g. aturing22.
Note: If it complains that the "ssh" command is not recognized, you will
need to install the OpenSSH client software first
(instructions for installing OpenSSH).
Type your password when prompted. You might not see any text as you type
the password. That's normal.
You're now logged onto logos. Whatever commands you now type
will run on logos, and you can use all of your logos
files.
When you are finished, type exit or logout at the prompt to log out of logos.
You will be back at your PC's powershell prompt. You can close PowerShell,
or start a new ssh session again.
SSH install instructions for Windows 10 or earlier versions:
Earlier versions of Windows don't always include SSH client software.
As long as you are going to the trouble of installing software,
you might choose to skip the text-only instructions here, and instead go right
to the "heavy-weight" but fully graphical approaches described below,
using MobaXterm or similar
software. But for text-only access, you can install "light-weight" SSH client
software. Look online to find a windows-compatable ssh client program for your
computer.
BitVise Client and
PuTTY are two
popular choices, but there are many others.
Or install git, which comes with
the very popular "OpenSSH" SSH client. Download the software and install it.
You can probably accept all of the defaults if it asks for configuration
options. Now, you can use this SSH software to connect to logos. The exact way
to run your ssh client will vary depending on which software you installed. For
the git software, you can probably run the Git Bash
program, then follow the instructions for Windows 10 using the Git Bash window
instead of a PowerShell window. For most others, it will probably be something
like this:
When the install is done, you should have an icon called "SSH Secure Shell Client"
or something similar on your desktop or in your start menu. Run that.
Find the Quick Connect button or menu option. Choose that.
In the dialog that appears:
Enter logos.holycross.edu in the "Hostname" field.
Enter your own username in the "Username" field, e.g. aturing22.
If given the option, make sure that "Port Number" field says 22 or
"ssh" or "default" (this should be the default).
You can probably leave any "Authentication Method" options alone.
Click Connect. When asked, enter your password.
A terminal window should now appear with a Linux prompt in it. Anything
commands you type here will run on logos, and you have access to all of your
logos files and directories.
You might be able to select save, or click the save button at the top of the
ssh client (it looks like a floppy disk). That makes it so that you don't have
to fill in all of the options next time you want to connect to logos.
When you are finished, type exit or logout at the Linux prompt, then close the SSH window.
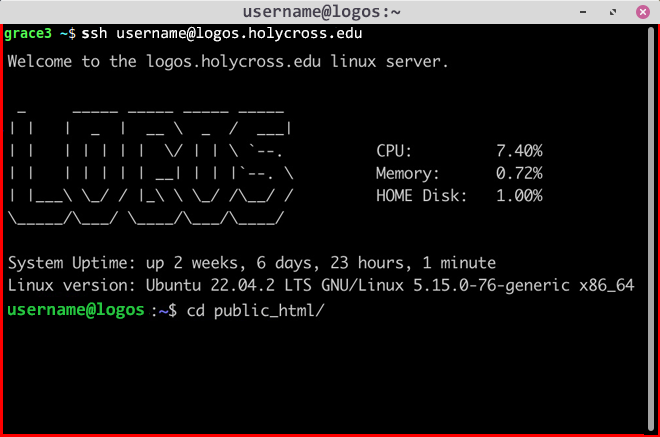
Check your SSH connection to logos: After connecting, you
should see a friendly greeting in your terminal window, with a prompt like
"aturing22@logos~$". If you now type commands in the terminal window, it should
respond. For example, if you type whoami, it should
print your login name.
Here is a screenshot demonstrating
a successful connection using SSH.
The biggest drawback to using SSH is that it is entirely text-only mode. By
itself, SSH does not support graphical applications. Typically, if you launch an
editor (like emacs, gedit,
or vim) within an ssh terminal window, you will not be
able to use your mouse to point and click, and will instead need to rely purely
on keyboard shortcuts for editing. Of course, the advantage is that using
keyboard commands is much faster than using the mouse, even if it takes some
time to become proficient. But for projects that need graphical support, you'll
have to use the graphical software described below.
Another thing you should note: once you have your terminal window logged into
logos, when you start certain programs (like emacs), they will run right inside your terminal window. And
they will completely take over the terminal window until you quit, so you won't
be able to enter any Linux commands until then. Once you quit emacs or
whichever program has taken over your terminal, it goes right back to being a
regular terminal again. For this reason, it is common to just open two or three
separate SSH windows, so you can have one for your editing, one for your Linux
commands, and other terminal windows for other things.
Sometimes you might want to copy files from your laptop to logos,
or vice versa. For example, if you find that editing files remotely is slow, or
you know you won't have good internet access, you might rather copy all your
files from logos to your laptop and edit them locally, then later copy
them back to logos when you are finished. You'll need two things.
First, you need a way to transfer files. SCP lets you copy files back and forth between
your logos home directory and your laptop. There are command-line versions of
scp, which must be used from within the terminal, and also several frinedly "graphical
SCP" programs you can install. Next, once you are able to transfer files, see below for
instructions on how to edit plain-text files locally on your laptop.
Graphical SCP Software for Mac OS
Visual Studio Code can transfer files using SCP, just drag-and-drop to the side bar in the vscode window.
WinSCP is more common, but older and a bit harder to use.
MobaXterm provides full
graphical remote access (as described below), but also includes a user friendly SCP client too.
Using SCP from the command line terminal
Mac OS X and Windows 10 both come with built-in command-line SCP programs.
For older versions of Windows, you can install install git, which comes with the
popular "OpenSSH" command-line scp program.
WARNING: scp is unforgiving... it will happily overwrite files if you
tell it to, without any warning or confirmation. If you have some file on your
computer that you have worked on and edited, but tell scp to transfer a new
copy from logos to your computer, scp will do it, and you will lose your
work. So be sure the "DESTINATION" file or folder in the command below is something
you are sure you don't mind losing.
Open a local command-line prompt. That means Terminal (for Mac OS),
PowerShell (for Windows 10), or Git Bash
(if you are using git's scp on an older version of Windows).
DO NOT log in to logos using ssh. You will instead run the scp
command locally, on your laptop, without logging in to logos, and the scp
command will connect to logos for you.
Run the scp command. It works almost just like the regular cp command to copy
files, but you can prefix the file path with your logos login
information. In all cases, the syntax is: scp -r SOURCE DESTINATION
where: the "-r" is needed if you are copying an entire directory;
SOURCE is always the name of some file (or directory) you want to copy; and
DESTINATION is the name of some directory where you want to put the new copy.
Either the SOURCE or the DESTINATION should be prefixed by
username@logos.holycross.edu:, to indicate that it is a remote
location. The other one should not have that prefix, and will be local to your
laptop. As always, replace username your own login name, e.g. aturing22.
For example, to
copy Hello.java from my remote labs/lab1 directory on logos (which is
within my logos home directory) to my own Mac's local
~/Desktop
directory, I might do something like this: scp username@logos.holycross.edu:labs/lab1/Hello.java ~/Desktop/
And to copy in the other direction, from my local laptop back to logos, I would do: scp ~/Desktop/Hello.java username@logos.holycross.edu:labs/lab1/
To copy a whole directory, recursively including everything inside the directory, use the -r option, like this scp -r username@logos.holycross.edu:labs/lab1 ~/Desktop/
If you are transfering files back and forth between logos and your own
laptop, you probably need a way to edit the files locally on your laptop. There are plenty
of plain text editors to choose from, and many have built-in support for
highlighting and indenting code.
Big Warning: Java, C++, and nearly all other programming languages use
plain text files, and you must edit them with a plain text editor. Relying
on "word processing" programs like Microsoft Word, Google Docs, or other "rich text"
programs often leads to trouble. Google Docs, for example, has an option for downlading as
"plain text" but the file it produces is not actually truly "plain text" and probably
won't work with Java or C++. We recommend using an editor designed for programming, or at
least an editor made specifically for plain-text editing.
The built-in TextEdit app that comes with Mac OS has
been around forever, and it can
work as a plain-text editor in a pinch.
But it lacks
indenting, code highlighting, and other features that make programming much
more productive and enjoyable. You also must to follow
these special steps to
enable the plain-text mode. Be sure you are not accidentally using "rich text"
mode!
The built-in Notepad
program that comes with Windows has been around forever, and will work in a pinch. But
it lacks indenting, code highlighting, and other features that make programming much
more productive and enjoyable.
The X11 Protocol, in combination with SSH, is a traditional way to get
graphical remote access to a Linux machine. Confusingly, what you need on your
laptop is the X11 "server" software. The X11 "client" software runs
remotely, and is already installed on logos. You may or may not get a
full "desktop" experience, depending on X11 server software you use. But when
you run graphical programs (like emacs in GUI mode, web browsers, or projects
that use graphics), they should open in their own window as if they were running
locally on your laptop, and you should be able to use the mouse to interact with
the remote programs.
Warning: Using X11 can be slow (and sometimes extremely slow),
especially if you are connecting from off campus or if you have a
less-than-stellar internet connection.
X11 Server Software for Mac OS
Depending on your version of Mac OS, you should probably be able to install
X11.app / quartz, a
free app. There are likely other X11 Server programs available for Mac as well,
but most seem to cost money. If X11.app / quartz does not work, try searching for "Mac X11 Server".
Run Quartz. A terminal should open (or use the Quartz menus to open a new
terminal window). Log in to logos by typing
this into the Quartz Terminal window: ssh -Y username@logos.holycross.edu As always, use your own login name instead "username", e.g. aturing22,
and use your regular Holy Cross password.
Once connected, you can run graphical java programs, the graphical version of
emacs, or run gedit (another friendly text editor), and
do other commands that have graphical interfaces or rely on mouse support.
Often it is a good idea to put an "&" after the command, so the command runs in
the background and does not take over
the terminal, like this: gedit &
If after you've checked your connection to logos (see xeyes below) you may need to run our startup script manually. Be sure to do this from your home folder, so type, cd, then type, source .bashrc to run the script.
X11 Server Software for Windows 10 and earlier
MobaXterm is
is one of many X11 servers for Windows. MobaXterm also comes with an SSH client
(for logging in without a graphical interface, using text-only mode), an SCP
client (for transferring files back and forth from your logos home directory to
your laptop), and a simple text file editor.
The "installer" version is fine, it puts an icon in your start menu. The
"portable" version is meant for putting on a USB thumbdrive when you are
borrowing someone else's computer.
Once connected, you can run the graphical version of
emacs, or run gedit (another friendly text editor), and
do other commands that have graphical interfaces or rely on mouse support.
Often it is a good idea to put an "&" after the command, so the command runs in
the background and does not take over
the terminal, like this: gedit &
To transfer files, you can drag-and-drop files between the MobaXTerm side
bar and your own laptop's desktop.
Check your X11 connection to logos: After connecting with
X11 enabled, you should be able to run the xeyes
command in a terminal window. It may take a moment, but some eyes should pop up
in a new window. You can close the window or press Control-C in the terminal to
halt xeyes. (This program is old and mostly useless, but is a
traditional way to check if an x11 connection is working.) If it instead says
"Error: Can't open display", then something has gone wrong. If using
ssh with XQuartz on Mac, maybe you forgot the "-Y" after the ssh
command, or forgot to run XQuartz before running ssh. If using
MobaXTerm on Windows, be sure to run the xeyes command within
MobaXTerm, not in a separate ssh terminal outside MobaXTerm.
Some steps to take if you are having trouble accessing logos remotely:
Ensure you are on HCWireless and are NOT using the the VPN. Or, use the VPN
with HCGuest or some other untrusted network besides HCWireless. In other
words, trusted network, or the VPN, one or the other but not both.
Ensure you are typing your login all lowercase, e.g.
"aturing25@logos.holycross.edu", not "ATURING25", and not "ATuring25", etc.
Ensure you are using the same password you normally use for STAR.
If using VSCode, make sure you are using a recent version. Some students
report that deleting VSCode from your computer then re-installing it helps.
When using VSCode to connect, if it asks whether the system is "Linux"
or "Windows", be sure to pick "Linux", since logos is a Linux server.
Open Terminal.app (on MacOS) or cmd.exe (on Windows), and type "ssh
yourlogin@logos.holycross.edu". If it asks for a password, type it (even if
you don't see anything happen as you type, go ahead and type the password
anyway). This can help narrow down if the problem is the network (if it
doesn't even ask for a password), or your account (if it asks for a password
but doesn't go beyond that), or VSCode (if you can log in using Terminal.app
/ cmd.exe, but not using VSCode).
If none of the above work, send email to
the ITS Helpdesk and the Math/CS server admin.
Please mention the results of the steps above and any specific error
messages you might be getting. If possible, please also include your IPv4
address from your settings (for MacOS, look in Network Settings > WiFi
> Details > IP Address; For Windows, try Settings > Network &
Internet > Wi-Fi > Properties > IPv4 Address). Websites that claim
to tell you your website won't work propertly for this step, you must go
into your settings instead.

 Big Warning: Java, C++, and nearly all other programming languages use
plain text files, and you must edit them with a plain text editor. Relying
on "word processing" programs like Microsoft Word, Google Docs, or other "rich text"
programs often leads to trouble. Google Docs, for example, has an option for downlading as
"plain text" but the file it produces is not actually truly "plain text" and probably
won't work with Java or C++. We recommend using an editor designed for programming, or at
least an editor made specifically for plain-text editing.
Big Warning: Java, C++, and nearly all other programming languages use
plain text files, and you must edit them with a plain text editor. Relying
on "word processing" programs like Microsoft Word, Google Docs, or other "rich text"
programs often leads to trouble. Google Docs, for example, has an option for downlading as
"plain text" but the file it produces is not actually truly "plain text" and probably
won't work with Java or C++. We recommend using an editor designed for programming, or at
least an editor made specifically for plain-text editing.
